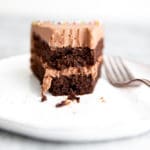
Gluten Free Chocolate Quinoa Cake with Chocolate Whipped Cream Frosting (Gluten Free)
This is my VERY FAVORITE chocolate cake to make and eat, and you would never know that it doesn’t contain a speck of flour and that it’s made entirely in the Vitamix or food processor (meaning no mixing bowls)! The cake is made with cooked quinoa, which provides a wonderfully moist texture, but you can’t taste it AT ALL. Take note that you'll need to cook the quinoa before starting the cake (check out the notes below). Raw (unprocessed) cacao powder lends an unparalleled deep chocolate flavor—if you can’t find it use the best quality cocoa powder you can find. The light and creamy chocolate whipped cream frosting also gets made in the Vitamix (or you can use hand beaters). The frosting is also fabulous on cupcakes, crepes and hot chocolate. This double layer cake is on the smaller side, but it easily feeds 8-10 people (you can also make cupcakes - see the Notes below!). It’s the ultimate birthday, holiday or special occasion dessert!
Servings: 1 8-inch cake
Ingredients
Chocolate Quinoa Cake
- Cooking spray or oil, for pans
- ½ cup milk
- 3 large eggs
- 2 teaspoons vanilla extract
- 2 teaspoons coffee liqueur or strong brewed coffee
- ½ cup (100 g) virgin coconut oil, melted and cooled slightly
- 2 cups (290 g) cooked quinoa, see notes below*
- 1 cup (190 g) organic cane sugar
- 1 cup (90 g) raw cacao powder (such as Navitas Naturals brand)
- 1 ½ teaspoons baking powder
- ½ teaspoon baking soda
- ½ teaspoon fine sea salt
Chocolate Whipped Cream Frosting
- 2 cups cold heavy cream
- ⅓ cup (44 g) powdered sugar
- ⅓ cup (30 g) raw cacao powder
- 1 tablespoon coffee liqueur (optional)
- 1 ½ teaspoons vanilla extract
- Pinch fine grain sea salt
Instructions
Make the cake
- For the cake, preheat the oven to 350˚F. Lightly grease two 8-inch cake pans with cooking spray or oil, and line the bottoms with parchment paper.
- In a Vitamix or food processor, combine the milk, eggs, vanilla, coffee liqueur and coconut oil. Blend until incorporated. Add the quinoa, sugar, cacao powder, baking powder, baking soda and salt. Blend, increasing the speed to high, until smooth, stopping and scraping occasionally.
- Divide the batter between the prepared pans and spread in an even layer. Bake 20-23 minutes, or until the cake springs back when lightly pressed and a toothpick inserted in the center comes out mostly clean with a few crumbles (don’t over-bake otherwise the cake will be dry). Let the cakes cool in the pans set on a wire rack for 10 minutes. Invert the cakes onto racks, and peel off the parchment. Let cool completely before frosting. Make it Ahead: Once cooled, the cakes can be wrapped well and stored at room temperature for up to 1 day (take care when moving the cakes, as they are very tender and can break fairly easily—I find it easiest to slide them onto the plastic wrap instead of picking them up.)
Make the frosting and assemble
- For the cocoa whipped cream frosting, place all of the ingredients in a clean Vitamix (or you can use a bowl with hand beaters). Blend on low until fully incorporated. Slowly increase the speed, and blend until the mixture is thickened and no longer moves around the blade (if using hand beaters, beat on high until thick and creamy). Take care not to over-blend, otherwise the frosting will turn a bit grainy (but it will still taste great).
- To frost the cake, very carefully slide one of the cake layers onto a cake stand or serving platter (the cake is very tender and has a tendency to break if it’s handled too much, so go slowly. That being said, if it does break, simply patch it back together on the cake plate—nobody will know!). Spoon about a quarter of the frosting on top, and spread it in an even layer. Place the second cake layer over top, and spoon on the remaining frosting. Spread the frosting in an even layer on top and around the sides of the cake. If possible, cover the cake with a dome or large bowl and refrigerate it for at least 1 hour before serving.
Notes
Do Ahead: The frosted cake can be refrigerated for up to 6 hours before serving. Leftovers (if you have any!) are also delicious the next day.
Tips:
- *You’ll need to start with ¾ cup of dry quinoa to yield at least 2 cups of cooked quinoa (be sure to use golden quinoa, not red or black quinoa, which will be too assertive in flavor). Rinse the quinoa well, then place it in a small saucepan with 1 ½ cups of water and a pinch of salt. Bring the water to a boil, then reduce the heat to a simmer. Cover and cook 15 minutes, or until the water is absorbed. Remove the pot from the heat and let sit 10 minutes, covered, to steam. Fluff the quinoa with a fork, then transfer it to a bowl and let it cool completely. Once cool, measure out 2 cups of cooked quinoa for the cake (you will have leftover quinoa, which you can toss is salads or use in grain bowls).
- The cake batter and frosting gets made in a high-speed blender such as a Vitamix, or you can use a food processor.
- You’ll need two 8-inch cake pans for this cake. Don’t be tempted to use 9-inch pans, as the cakes will be too thin.
- You can also make cupcakes! This recipe makes 16 cupcakes (the baking time is the same). Line the cupcake tins with parchment cups so that the cupcakes don't stick.
- Using raw cacao powder in this cake gives it a richer chocolate flavor. You can find it online or in many grocery stores (p.s. it makes the best hot chocolate!).
- You can swap out the coffee liqueur in the cake batter for strong brewed coffee (you can also omit it completely from the frosting if you prefer).
- Before frosting the cake, I like to slide narrow strips of parchment paper under the edges of the cake so that I don't get my serving platter dirty (see the video for reference!).