Easy Gluten Free Crepe Recipe (Sweet or Savory!)

This gluten free crepe recipe is simple to make and delivers thin, tender crepes with lightly crisp edges that taste just like the classic version. The batter comes together quickly in a blender, rests in the fridge for better texture, then cooks on a nonstick skillet right on the stovetop. I'll walk you through each step and share practical ways to serve these crepes for breakfast, lunch, dinner, or dessert.
Why You’ll Love These Gluten-Free Crepes
These gluten-free crepes are thin, tender, and flexible, with lightly crisp edges that hold up beautifully to both sweet and savory fillings. The batter blends up quickly, rests briefly for better texture, and cooks easily on a nonstick skillet, making this a recipe you can rely on for everyday cooking or special occasions. Pair them with breakfast favorites like Blueberry Almond Scones and Paleo Banana Bread for a full brunch spread.
They're also incredibly versatile. You can make them dairy-free with almond or soy milk and dairy-free butter, then serve them with anything from lemon and sugar, to chocolate, to ham and cheese, eggs, or smoked salmon. If you want to warm the fillings or melt the chocolate or cheese, just fold the crepes and heat them briefly in the oven until warmed through.
Nicki's Tip: Resting the batter is especially important for gluten-free crepes (you can do this the day before!). The chill time allows the flour to fully hydrate, which helps the crepes cook up smoother, more flexible, and less prone to tearing. If the batter thickens after resting, just give it a quick whisk or blend before cooking to bring it back to a pourable consistency.
Ingredients You'll Need
These gluten-free crepes are made with simple pantry ingredients that work together to create a thin, tender batter that cooks evenly and holds together well.
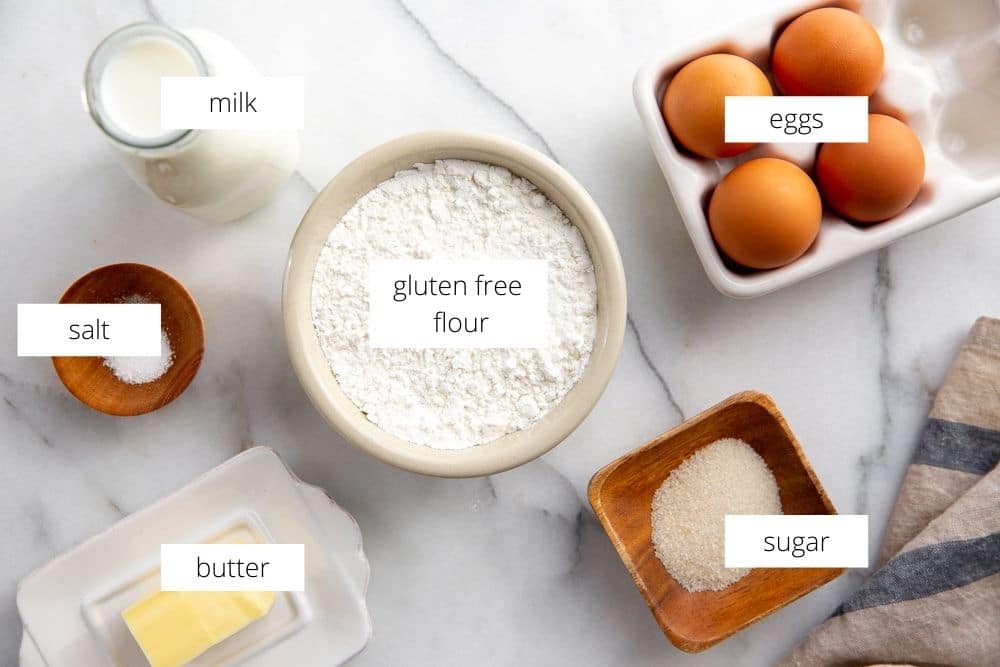
- Gluten-free flour: Use an all-purpose gluten-free flour blend that already contains xanthan gum, which helps replace the structure gluten normally provides. Bob's Red Mill Gluten Free 1-to-1 Baking Flour and King Arthur Measure for Measure both performed consistently well in testing.
- Milk: Whole milk creates a tender yet sturdy crepe that is easy to flip and less likely to tear. For a dairy free option, almond milk or soy milk work well with no other changes to the recipe.
- Eggs: Eggs act as the primary binder in this gluten free crepe recipe, giving the crepes strength and flexibility while keeping the texture light.
- Butter: Melted butter adds flavor and helps prevent a gummy texture, which can be an issue with gluten-free batters. A dairy free butter can be used if needed.
- Sugar: A small amount of sugar improves flavor and encourages even browning, even when making savory crepes.
- Salt: Salt balances the batter and keeps the crepes from tasting flat, especially when paired with sweet fillings.
How to Make Gluten Free Crepes
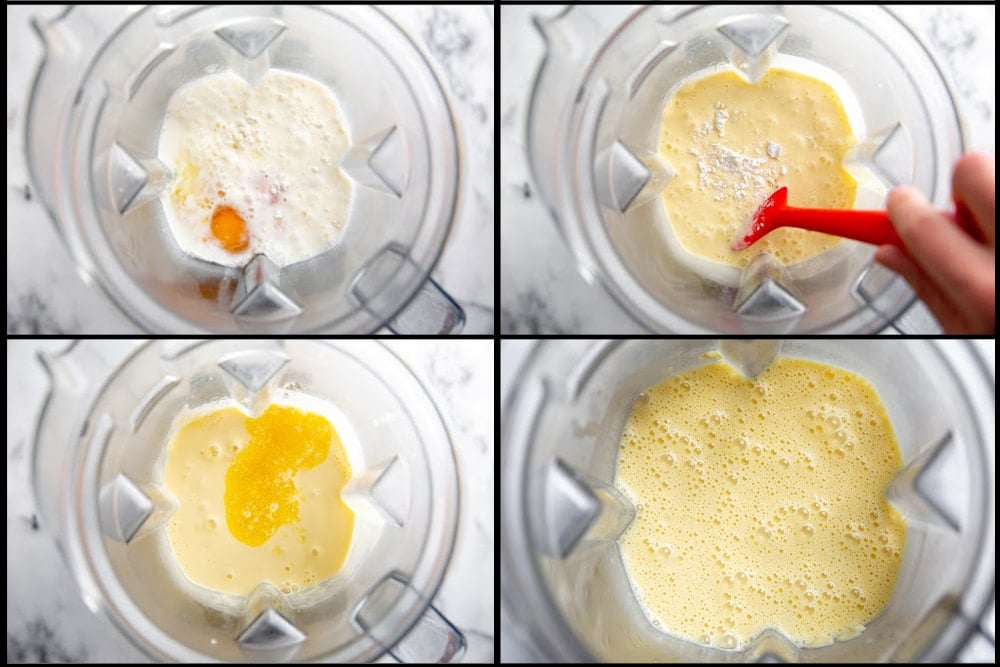
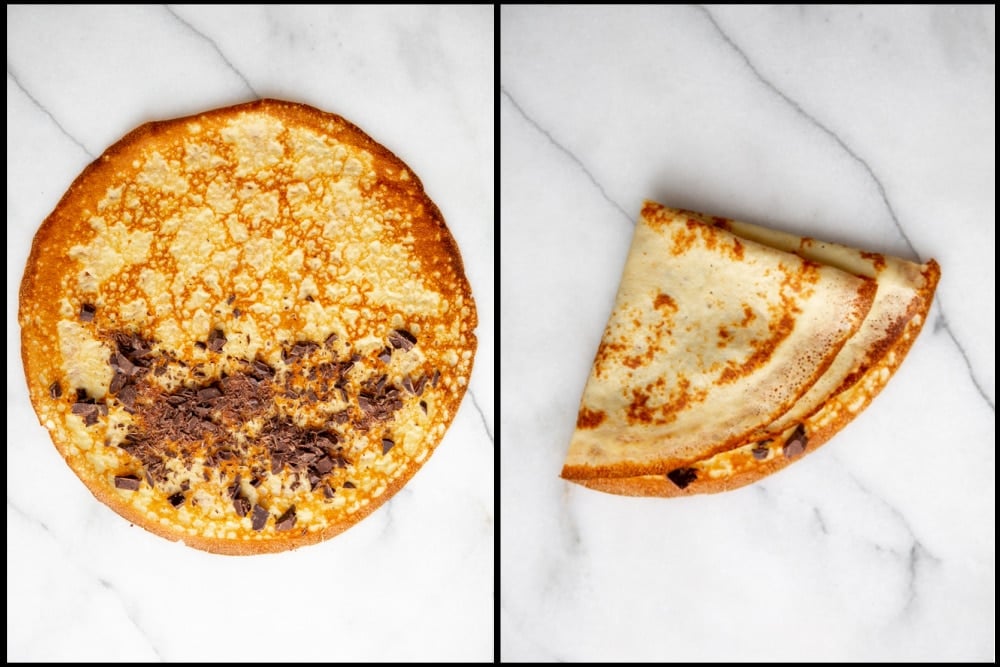
Step 1: In a blender combine gluten-free flour, sugar, salt, milk and eggs. Blend until smooth. Scrape the sides, then add melted butter. Blend again until fully incorporated.

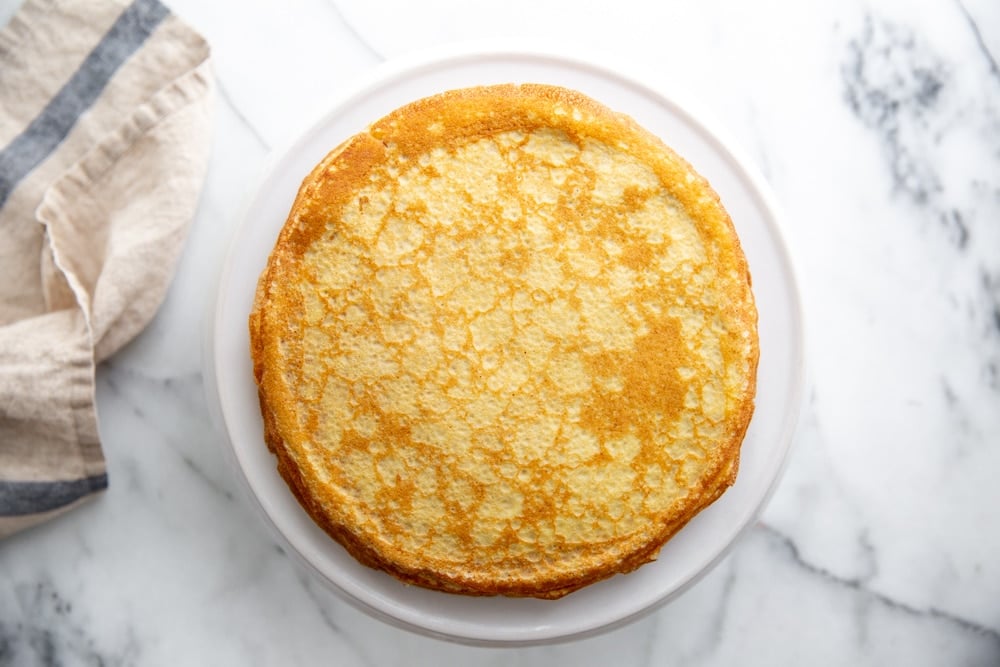
Step 2: Preheat a 10-inch nonstick skillet over low heat with 1 teaspoon of vegetable oil for 5 minutes. Increase the heat to medium. Use a paper towel to wipe the oil over the pan, removing any excess. Pour in ⅓ cup of the batter and immediately swirl the pan to evenly coat the bottom. Let cook until the crepe is browned along the edges, about 30-60 seconds.

Step 3: Use a thin spatula to loosen the crepe from the pan, then use your fingers to flip the crepe over (the crepe will be hot so work quickly!). Cook until it's browned in spots on the other side, about 15 seconds longer. Transfer the crepe to a cooling rack and repeat with the remaining batter, stacking the crepes as they're cooked.
Recipe Tips
- You'll need a 10-inch nonstick pan for this gluten free crepes recipe (I LOVE my ScanPan), although you can use a bigger or smaller pan for larger or smaller crepes (adjust the amount of batter you add to the pan). I don't recommend using cast iron, as it's hard to swirl the batter, and the crepes tend to stick. You can also use a crepe pan if you have one!
- The sugar is key for flavor (even if you're making savory crepes), and it helps the crepes brown. We usually go for 1 tablespoon and sweeten the crepes further with toppings or a dusting of sugar.
- Be sure to preheat the pan, as it will create consistent, even heat, allowing the crepes to evenly brown.
- Swirling the batter into the pan takes practice! The more you make crepes, the easier it will become. And don't worry if they don't look perfectly round-they will still taste delicious.
- Use a thin spatula, such as a fish spatula or an off-set spatula to loosen the crepe from the pan before flipping.
- The crepes will be hot when you flip them with your fingers, so work quickly (or you can wear heat resistant gloves!).
- Transform these crepes into a STUNNING crepe cake!
Serving Suggestions
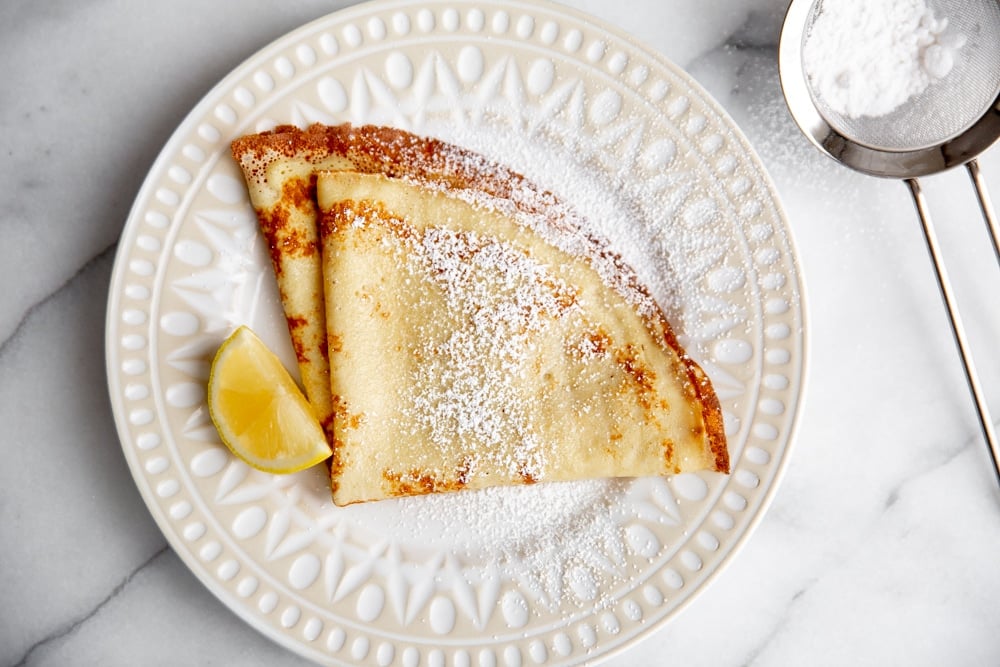
These gluten free crepes are incredibly versatile and can be served in a million different ways! Below are some of my favorite sweet and savory variations. To heat fillings (such as to melt chocolate or cheese), warm the crepes in 350-375˚F (175-190˚C) oven for 5-10 minutes.
Sweet Crepes
- Dot with butter and sprinkle with lemon juice and sugar
- Sprinkle with chopped chocolate or chocolate chips then bake until warmed through
- Spread with Nutella or peanut butter
- Spread with jam and top with fresh fruit and whipped cream or ice cream
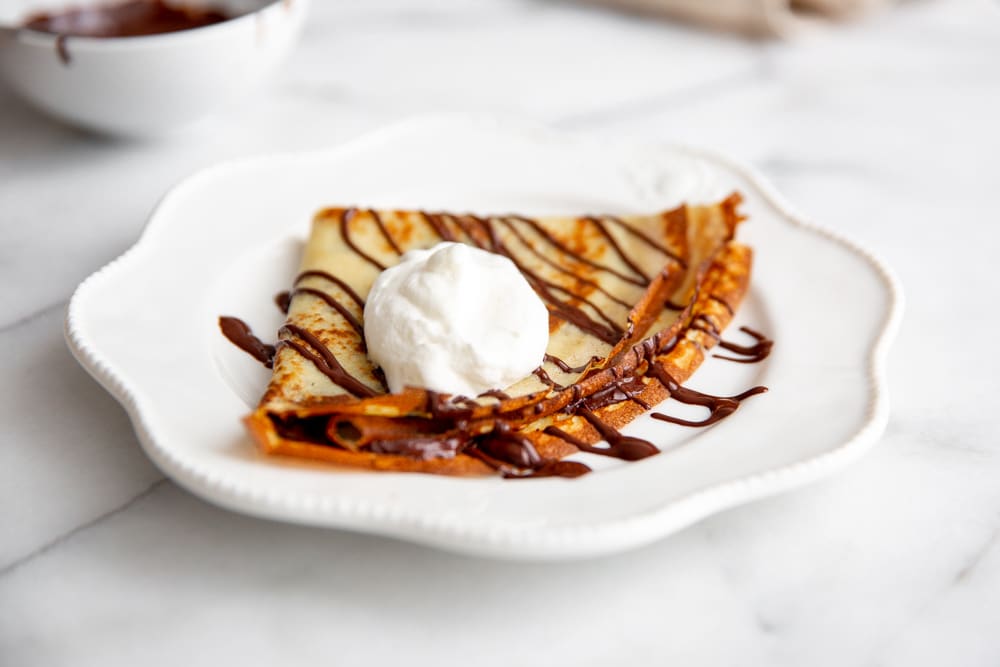
- Stuff with sliced bananas, drizzle with melted chocolate and top with whipped cream or ice cream
- Stack the crepes into a crepe cake.

Savory Crepes
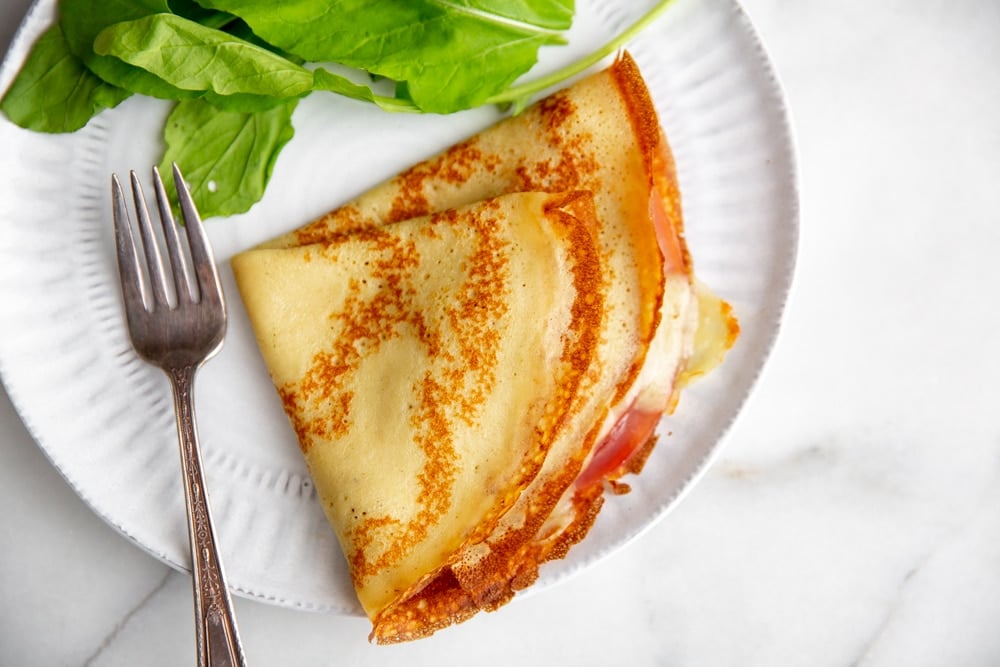
- Layer with ham and cheese and bake until the cheese melts
- Top with a fried egg and cheese
- Stuff with sautéed spinach, mushrooms and goat cheese or ricotta
- Stuff with scrambled eggs and chives
- Top with smoked salmon, capers and chives, and drizzle with creme fraiche
Recipe FAQs
Yes! The crepe batter can be made up to 1 day before cooking. Once cooked, the cooled crepes can be refrigerated for up to 5 days or frozen for up to 2 months! They're perfect for quick meals and easy desserts.
Let the crepes cool, then store them in a large zip-top bag. If frozen, let the crepes thaw at room temperature until you can pull them apart.
If frozen, let the crepes thaw at room temperature until they can be easily separated. Warm them in the microwave for 15 to 30 seconds, depending on your microwave. You can also add fillings and heat the crepes in a 350 to 375 degree oven until warmed through.
*This post contains Amazon and other affiliate links to products I use and love (from which I earn income, at no cost to you). Thank you for supporting From Scratch Fast!
Watch the Video!
Stay Connected

Subscribe
Get exclusive new weekly recipes (all gluten-free, but you'd never know it), along with tips for finding more intention, ease, and joy in the kitchen in my Mind, Body, Spirit, FOOD newsletter!
Get the Recipe!

Gluten Free Crepe Recipe (Sweet or Savory!)
Equipment
- 10 inch non-stick skillet
Ingredients
- 1 cup (148g) gluten free or all-purpose flour (I recommend Bob's Red Mill Gluten Free 1-to-1 Baking Flour)
- 1-2 tablespoons sugar, to taste
- ¼ teaspoon fine sea salt
- 1 ½ cups whole milk
- 4 large eggs
- 3 tablespoons unsalted butter, melted and cooled slightly
- 1 teaspoon vegetable oil
Instructions
- In a blender, combine the flour, sugar (I suggest using 1 tablespoon for savory crepes and 2 tablespoons for sweet crepes), salt, milk and eggs. Blend until smooth. Scrape the sides and add the melted butter. Blend again until smooth, scraping the sides as needed to incorporate all the flour. Refrigerate the batter for 30 minutes, or overnight.
- Pour the vegetable oil into a 10-inch nonstick skillet over low heat. Let the pan preheat for 5 minutes (this will ensure that the crepes brown evenly). Take the crepe batter out of the fridge and give it a whisk (or you can re-blend it).
- Once the pan is preheated, increase the heat to medium. Using a paper towel, rub the oil over the bottom of the pan (wipe out any excess oil). Pour in ⅓ cup of the batter and immediately swirl the pan to evenly coat the bottom (check out the video above to see how it's done!).
- Cook the crepe until the edges are browned and the bottom is golden, about 30-60 seconds. Using a spatula, loosen the edge of the crêpe, then use your fingers to flip it over. Cook until golden on the other side, about 15 seconds.
- Transfer the crêpe to a wire rack. Repeat with rest of batter, stacking the crêpes on top of one other as they're finished. If needed, rub the bottom of the pan with a bit more oil if the crepes start to stick-this will depend on the pan you use (I usually don't need to add more oil). Let the crepes cool completely.
Notes
- You'll need a 10-inch nonstick pan for this gluten free crepes recipe (I LOVE my ScanPan), although you can use a bigger or smaller pan for larger or smaller crepes (adjust the amount of batter you add to the pan). I don't recommend using cast iron, as it's hard to swirl batter and the crepes tend to stick.
- I recommend using Bob's Red Mill Gluten Free 1-to-1 Baking Flour or King Arthur Gluten Free Measure for Measure Flour, both of which performed the best in my recipe testing.
- The sugar is key for flavor (even if you're making savory crepes), and it helps the crepes brown. We usually go for 1 tablespoon for savory crepes and 2 tablespoons for sweet crepes.
- For a dairy free version use almond milk or soy milk and a dairy free butter.
- Blending the batter ensures it turns ultra smooth with no lumps, which is important for thin crepes.
- It's important to let the batter rest for at least 30 minutes (or for up to 1 day) before cooking the crepes. This allows the flour to absorb the liquid in the batter, resulting in a smoother consistency. Be sure to give the batter a whisk or blend before cooking.
- Be sure to preheat the pan, as it will create consistent, even heat, allowing the crepes to evenly brown.
- Swirling the batter into the pan takes practice! The more you make crepes, the easier it will become. And don't worry if they don't look perfectly round-they will still taste delicious.
- Use a thin spatula, such as a fish spatula or an off-set spatula to loosen the crepe from the pan before flipping.
- The crepes will be hot when you flip them with your fingers, so work quickly (or you can wear heat resistant gloves!).
- Transform these crepes into a STUNNING crepe cake!


Hello, recipe looks great, Do I have to use the Gluten Free flour??? Can I use Gold Medal flour and what are the cooking directions as well as he heating directions. Thank you. Barbara
Hi Barbara! You can absolutely use Gold Medal all-purpose flour instead of gluten-free flour. The full recipe with all of the instructions is at the bottom of the post. I hope you enjoy!!
Made the recipe exactly as written and they were perfect! I grew up eating crepe Suzette so that’s what I made and oh my!! Delicious!!!
I’m so happy to hear this, Linda! (And crepes Suzette are the best 😊)
Do you think oat milk will work?
Hi Jay, I do think oat milk will work. While I haven’t tested it directly, I’ve had several readers use it with success!
I used our go-to gfjules flour and they were fabulous! They rivaled the crepes we had in France before being GF.
This makes me so happy to hear!
Mom was Hungarian so I grew up with Palascintas, the Hungarian version. She used two pans, flipping one over into the other, after the first side was done. This gets your meal done quickly, still warm for all, and you don't need to fuss with a spatula or burn your fingers flipping them. There is a continuous stream of crepes coming out of the pan so you don't have to stand there just watching and waiting as each side cooks. I use my smaller pan first because it forms the crepe to its size. The second pan can be the same size or larger. Thanks for the recipe.
I love that!
I made this recipe with my mom and it tasted amazing! Thanks!
Hi Halle, thank you for your comment, and I'm so glad you enjoyed!
I don’t know what I did wrong, but these did not turn out for me. I refrigerated the batter for over an hour, but it was still very runny and I didn’t end up with one perfect crêpe. They all fell apart, no matter how thin or thick I made them. Very disappointing.
Hi Lauren, I'm so sorry to hear this? Can I ask what brand of GF flour you used?
Just came across this and had a question. When you say ‘blender’ do you legit mean a blender and not like a paddle attachment or a food processor?
Thanks!
Hi Josh, yes, I mean a legit blender! Any blender will work. I hope you enjoy!
Worked awesome and I don’t know what I’m doing. Thank you!
Hi Bruce, I'm so glad to hear (and clearly you DO know what you're doing 😂)!!
Can full fat coconut milk (in the can...not the carton) be substituted for almond or soy milk? Also,
Thank You
Hi there! Yes, you can use full fat coconut milk in these crepes. Just be sure to stir the milk well before using. I hope you enjoy!
I made this recipe; it came out soft and buttery, not overly sweet. This recipe is just perfect. Thank you for the recipe.
Thank you for your comment, and I'm so glad to hear!
I used Pillsbury Gluten Free Flour with lactose-free milk! I just had to use a higher heat and they came out great! Thanks for the recipe.
I'm glad to hear the Pillsbury Gluten Free Flour works too! Thank you so much for sharing. 🙂
I used Bobs 1 to 1 flour. Since we needed lactose free I used soy milk.
I let the batter rest before cooking and preheated pan. They were wonderful!
Thank you.
I'm so glad you liked them, Karen!
Hi Nicki.
Just wondering, can I use Cup4Cup GF flour instead of Bob's Red Mill flour?
-Raine
Hi Raine! Cup4Cup flour didn't perform well in the crepes during testing, so it's best to use either Bob's Red Mill or King Arthur. Let me know if you give them a try, and happy holidays!