Easy Gluten Free Ice Cream Sandwiches (Vegan Option!)
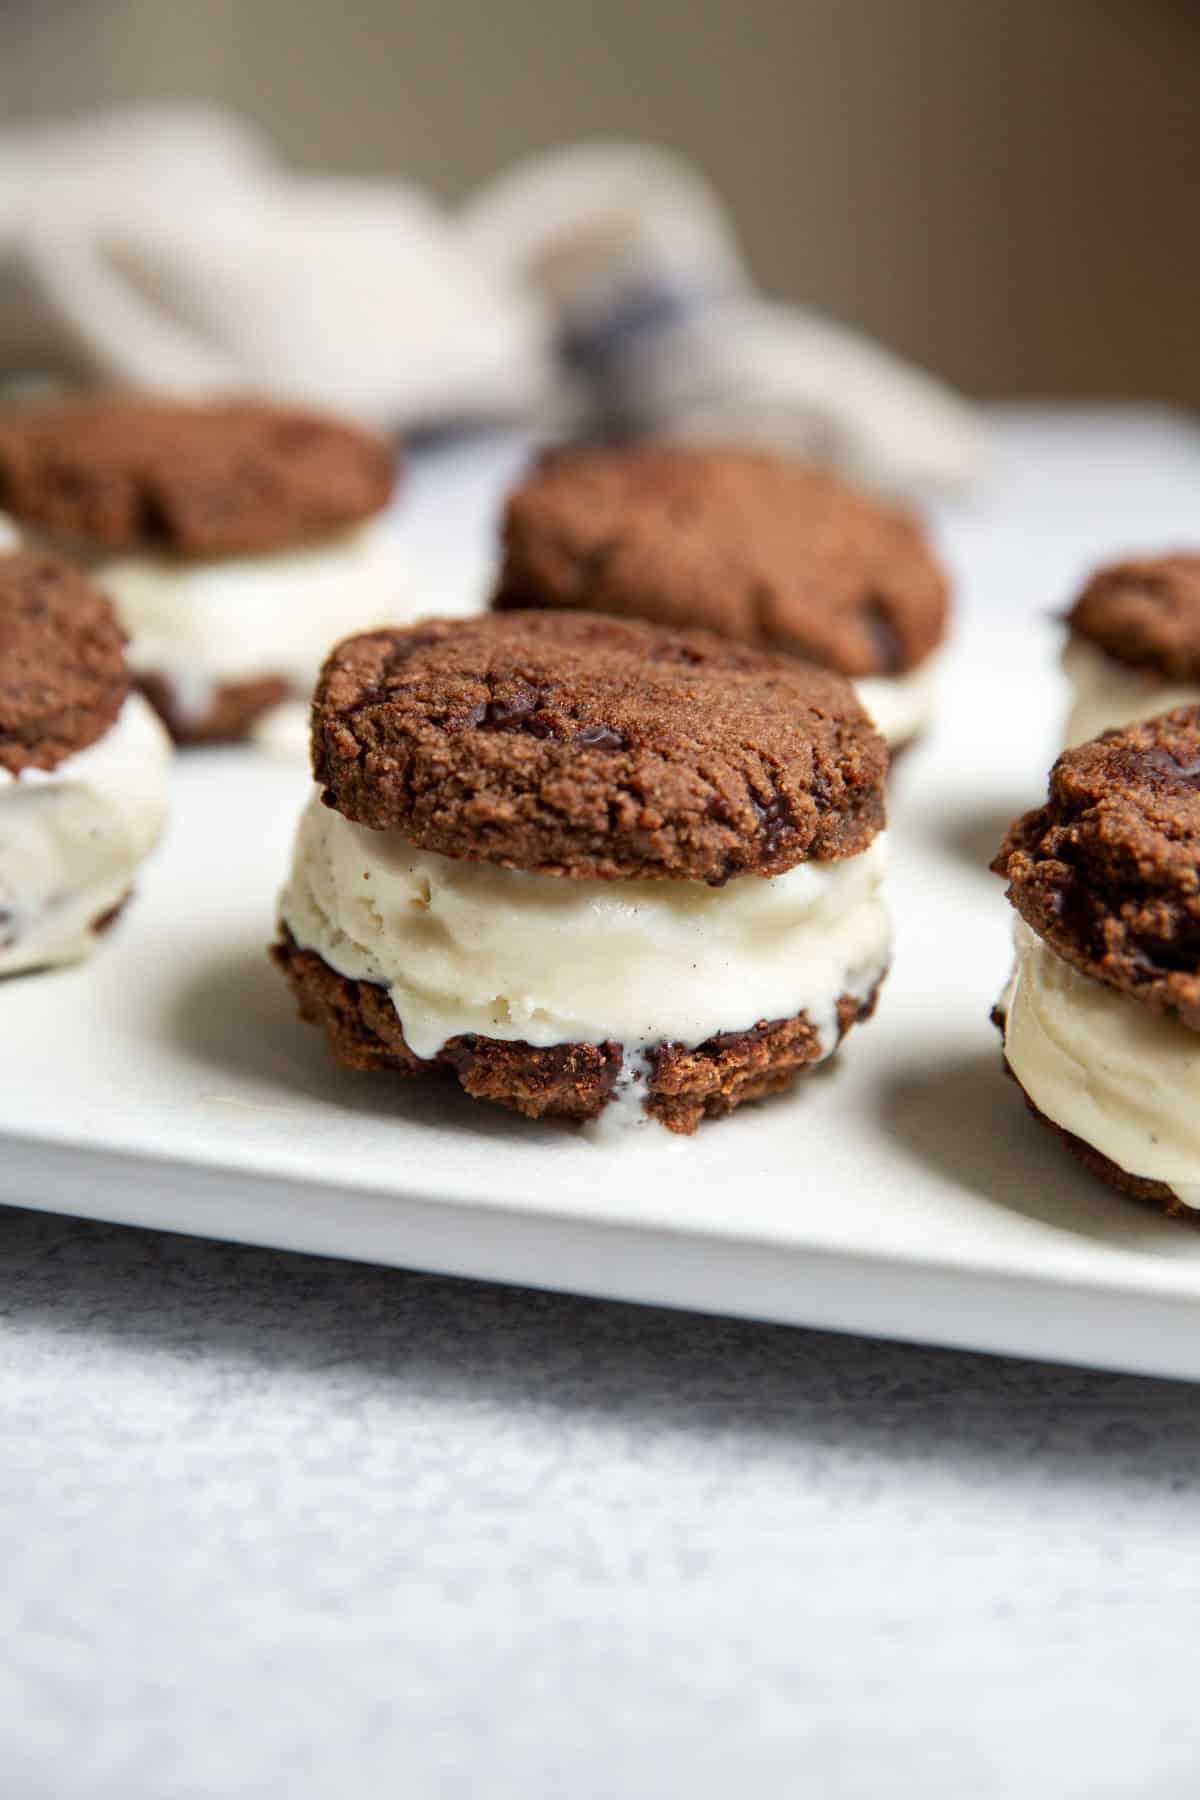
These gluten free ice cream sandwiches are proof that summertime desserts can be indulgent, allergy-friendly, and incredibly easy to make. Fudgy chocolate cookies sandwich a scoop of creamy vegan coconut ice cream for a treat that's every bit as nostalgic and satisfying as the classic version, without the gluten, dairy, or artificial ingredients.

Why You'll Love This Recipe
This recipe was born on a Fourth of July party years ago but become a summer staple by popular demand. Originally intended for the kids, the chewy ice cream sandwiches stole the show from the "fancier" desserts at the party, and have done so every year since (often accompanied by other summer favorites like ice cream pie or vegan mango ice cream).
The secret lies in the cookies: they're naturally sweetened, slightly salty in the best way, and stay soft even after freezing. They're easy to assemble, totally make-ahead, and a dream for potlucks or warm nights on the patio. Divine!
Nicki's Tip: The gluten-free cookie dough mixes up in one bowl and uses simple pantry ingredients: almond flour, coconut flour, maple syrup, and cacao powder. And while I love pairing them with vegan coconut ice cream (like Coconut Bliss), they're just as delicious with traditional dairy-based scoops.

Ingredients You'll Need
- Almond flour & coconut flour: These provide a soft, tender structure that holds together well even when frozen. Almond flour lends richness, while coconut flour helps absorb moisture.
- Cacao or cocoa powder: Adds deep chocolate flavor to the cookies. Raw cacao brings a slightly earthier edge, but either works beautifully.
- Maple syrup: Naturally sweetens the cookies and keeps them chewy.
- Coconut oil: Gives the cookies richness and helps them stay soft straight from the freezer.
- Dark chocolate or chips: Folded into the dough for extra chocolatey goodness.
- Vegan coconut ice cream: Coconut Bliss or similar brands work well, but feel free to use any dairy or non-dairy ice cream you love.
How to Make Gluten Free Ice Cream Sandwiches
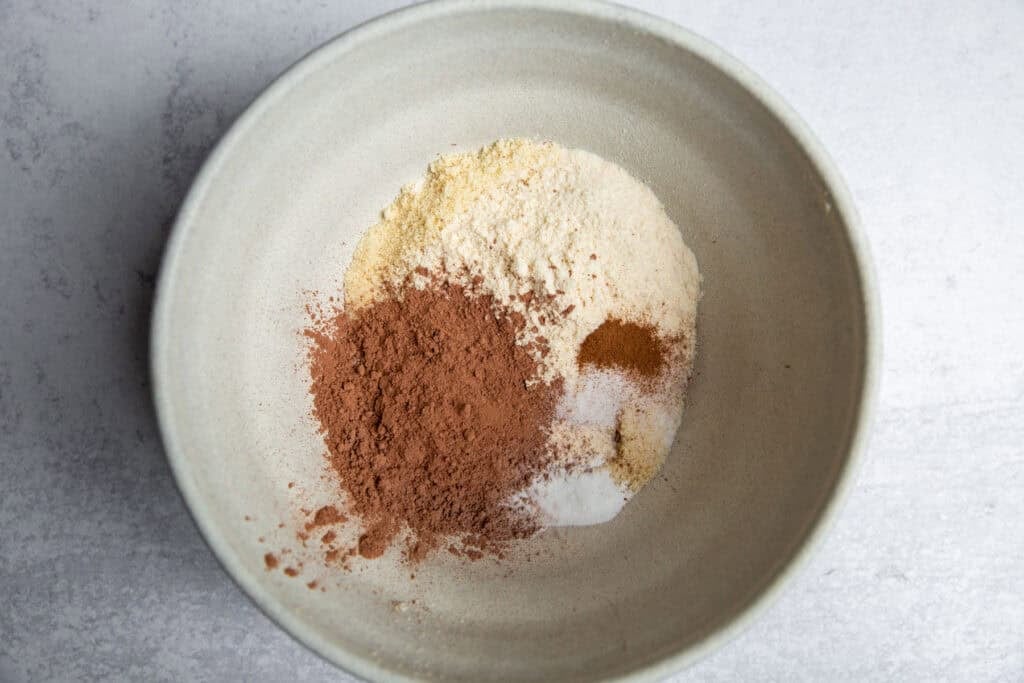
Step 1: Preheat the oven to 350°F and line two baking sheets with parchment paper. In a medium bowl, whisk together the almond flour, coconut flour, cacao powder, baking soda, salt, and cinnamon.
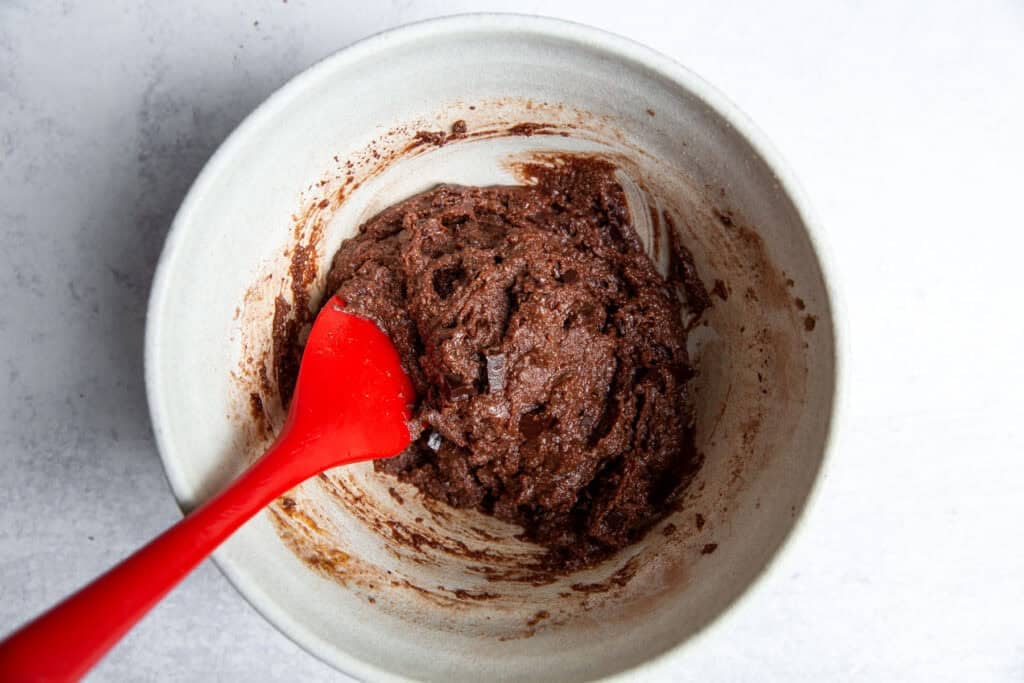
Step 2: Stir in melted coconut oil, maple syrup, and vanilla until smooth. Fold in chopped chocolate. Chill the dough for 5 minutes.

Step 3: Scoop tablespoon-sized mounds of dough onto the baking sheets, spacing them a few inches apart.

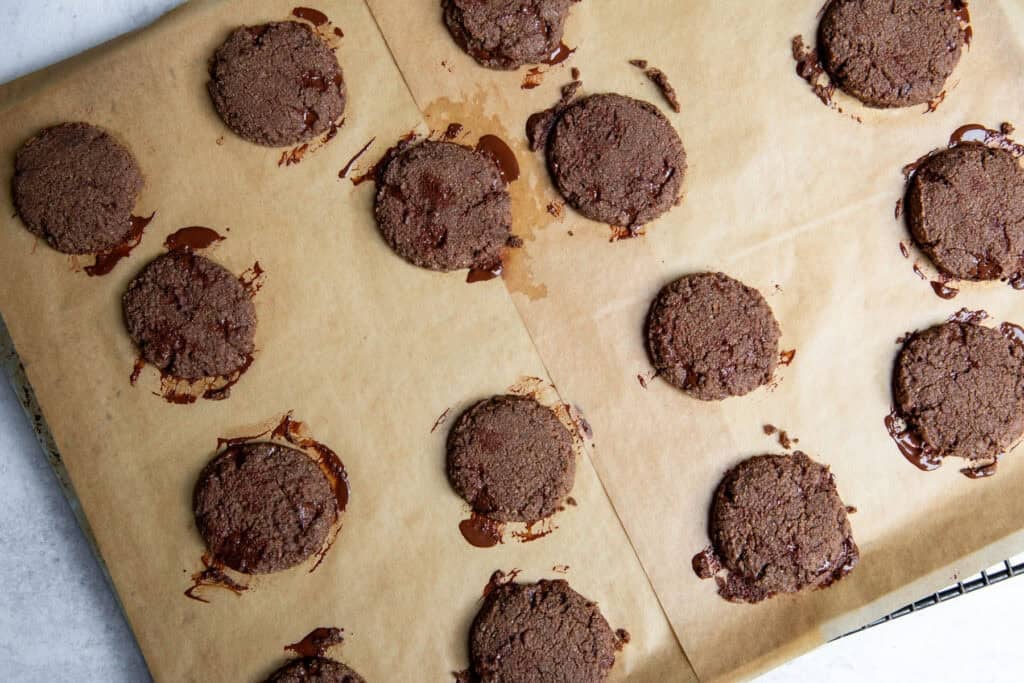
Step 4: Bake for 5 minutes, then rotate the pans. If cookies haven't flattened, gently press them down with a spatula. Bake another 6 minutes until dry on top. Cool on the pan for 5 minutes.
Step 5: Transfer cookies to a wire rack and chill in the freezer for 5 minutes until firm. You can freeze the cookies at this stage for up to 2 months.
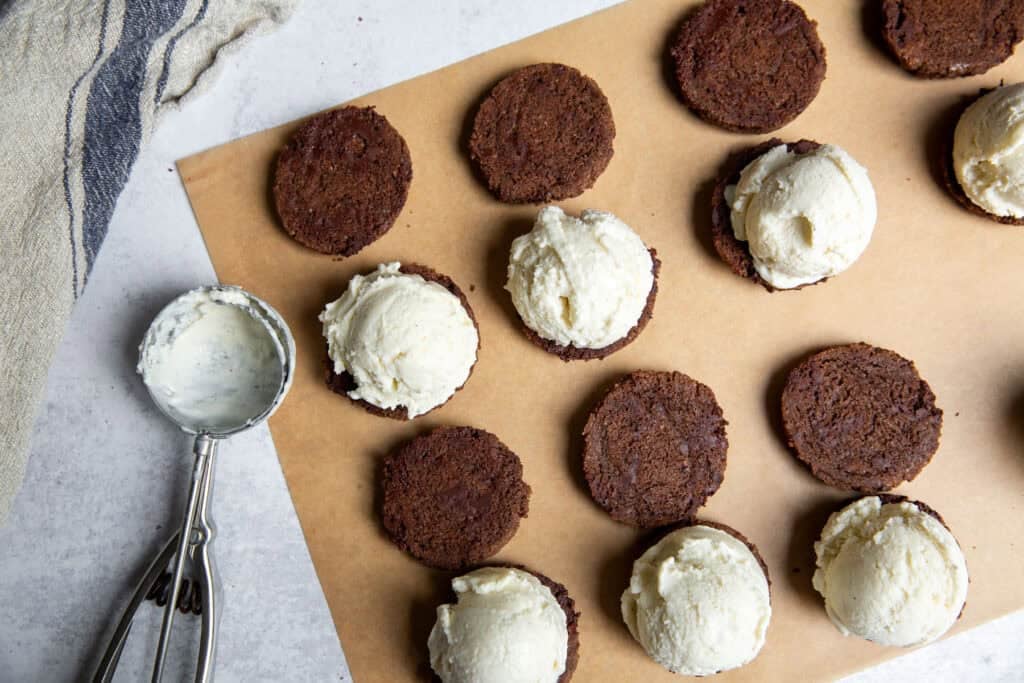
Step 6: To assemble, lay half the cookies flat-side up on parchment paper. Top with scoops of ice cream, then press another cookie on top. Eat immediately or freeze to firm up.

Recipe Tips & Variations
- Make-ahead: Assemble and freeze the sandwiches for 5-10 minutes before wrapping individually in wax paper and storing in a container or freezer bag.
- Pro tip: Slightly underbaking the cookies ensures they stay soft and pliable when frozen.
- Vegan-friendly: The cookies are fully vegan, and when paired with a non-dairy ice cream, the whole dessert is plant-based.
- Flavor twist: Try sandwiching with other ice cream flavors you love.
- What makes this version better: Unlike many recipes that turn rock-hard in the freezer, this cookie base stays soft thanks to a tested almond-coconut flour blend.
Recipe FAQs
Almond flour and coconut flour work especially well because they create a soft, bendable texture that doesn't become rock-hard in the freezer.
Yes! The cookie base is naturally vegan, and you can use any dairy-free ice cream you like.
Make sure the cookies are completely cool and slightly soft before assembling. Freeze briefly before serving.
Wrap each sandwich in wax paper and place in an airtight container in the freezer. They'll keep for several weeks.
These gluten free ice cream sandwiches are a hit every time - fudgy, creamy, and ridiculously easy. Whether you're serving them at a party or stocking your freezer with sweet treats, they're a feel-good favorite you'll want to keep on repeat.
Stay Connected

Subscribe
Get exclusive new weekly recipes (all gluten-free, but you'd never know it), along with tips for finding more intention, ease, and joy in the kitchen in my Mind, Body, Spirit, FOOD newsletter!
Get the Recipe!

Easy Gluten Free Ice Cream Sandwiches (Vegan Option!)
Ingredients
- ⅔ cup (85g / 3oz) lightly packed almond flour
- ⅓ cup (43g / 1.5oz) lightly packed coconut flour
- 3 tablespoons (17g / 0.6oz) raw cacao powder or regular unsweetened cocoa powder
- 1 teaspoon baking soda
- ½ teaspoon fine sea salt
- ⅛ teaspoon cinnamon
- ½ cup (100g) coconut oil, melted
- ½ cup (165g) maple syrup
- 1 teaspoon vanilla extract
- 3.5 ounces (100g) dark chocolate, chopped (about ¾ cup chopped), or ¾ cup chocolate chips
- 1 ½ pints ice cream (vegan or regular)
Instructions
- Preheat the oven to 350˚F. Line 2 large baking sheets with parchment paper.
- In a medium bowl, whisk together the almond flour, coconut flour, cacao powder, baking soda, salt and cinnamon. Add the coconut oil, maple syrup and vanilla. Stir well to combine. Fold in the chopped chocolate. Refrigerate the dough for 5 minutes to allow the flour to absorb the liquid.
- Using a tablespoon measuring spoon or a small ice cream scoop, scoop heaping tablespoon mounds onto the baking sheets, spacing them 2-3 inches apart.
- Bake 5 minutes. Rotate the pans and switch their positions. If the cookies have not flattened (if they still look like little mounds), use the back of a metal spatula and carefully flatten them (wipe the spatula clean as needed to prevent sticking). Bake 6 minutes longer, or until the cookies look dry on top (they will still be very soft). Let the cookies cool on the pans for 5 minutes.
- Using a thin spatula, carefully transfer the cookies to a cooling rack. Pop the rack in the freezer for 5 minutes, or until the cookies are completely chilled and firm. Do Ahead: The chilled cookies can be wrapped tightly and frozen for up to 2 months.
- Line a work surface with wax or parchment paper (this is just to keep things clean). Place half of the cookies flat side up on the paper. Top each with a scoop of ice cream. Top with the remaining cookies, and press down gently to distribute the ice cream to the edges. You can eat the sandwiches right away, or you can pop them onto a sheet tray and freeze them for 5-10 minutes, until firm. Once frozen, the sandwiches can be individually wrapped in wax paper and stored in an airtight container or a ziptop freezer bag.
Notes
- I always recommend using an inexpensive kitchen scale when baking (especially when using gluten free flours). It makes baking fuss free (no measuring cups needed!) and it's much more accurate.
- If the cookies haven't flattened when baking (due to the type and amount of flour used), flatten them with a small spatula halfway through baking.
- Be sure to let the cookies cool for 5 minutes before transferring them to a cooling rack. They will be very soft, but they will firm up once chilled.
- I love Coconut Bliss ice cream, but you can use any non-dairy or regular ice cream you like!


I always come back to this recipe. Been making it for years now and it still one of my most favorite desserts!!
This makes me so happy to hear!! ❤️
These were amazing! So memorable, satisfying, and delicious. Thank you!!
Yay! I'm so happy to hear. 😊
5
4.5